


A few months ago I heard about the Warberry Pi project – a great little project that uses a Raspberry Pi to covertly gather intel on the network that it’s dropped onto. The thinking behind this project is that the Pi is small enough for a red teamer to surreptitiously hide in a target location, gather as much network environment information as possible, all whilst being affordable and powerful enough to do the required job. If you’re testing the physical security and access of a target, or embarking on a social engineering engagement, having a pocket sized device that can be quickly plugged into a network is a great addition to your kit.
It’s very straightforward getting everything set up, I’ve added a couple of other tools/programs that I’ve found help whilst using the Warberry Pi. To avoid any potential conflicts or issues with an existing Raspberry Pi, you might want to consider starting with a clean slate. For this project I purchased a new Raspberry Pi 3 Model B+, with a 32Gb SD card. I did have a Raspberry Pi 2 in a drawer somewhere, but that was earmarked for another project . I bought my new Pi from ModMyPi, who I’ve always found to be reliable and good on price. The kit I bought is “The Official One Kit” that ships with A Pi 3 Model B+, a decent looking case, a power adapter, and a 32Gb SD card. With shipping this came to £63.00
Once the kit arrived, I started to build the Warberry Pi in this sort of (ish) order:
Download Raspbian and write to SD card (with SSH support)
First download the latest Raspberry Pi OS, ‘Raspbian’. You can grab either the full desktop version, or if you’re only even going to access the Pi via SSH command line, grab the Lite version. Once the download was complete it was time to burn the downloaded image. I’ve recently been using Etcher to flash SD cards, it’s very simple and fast to run.
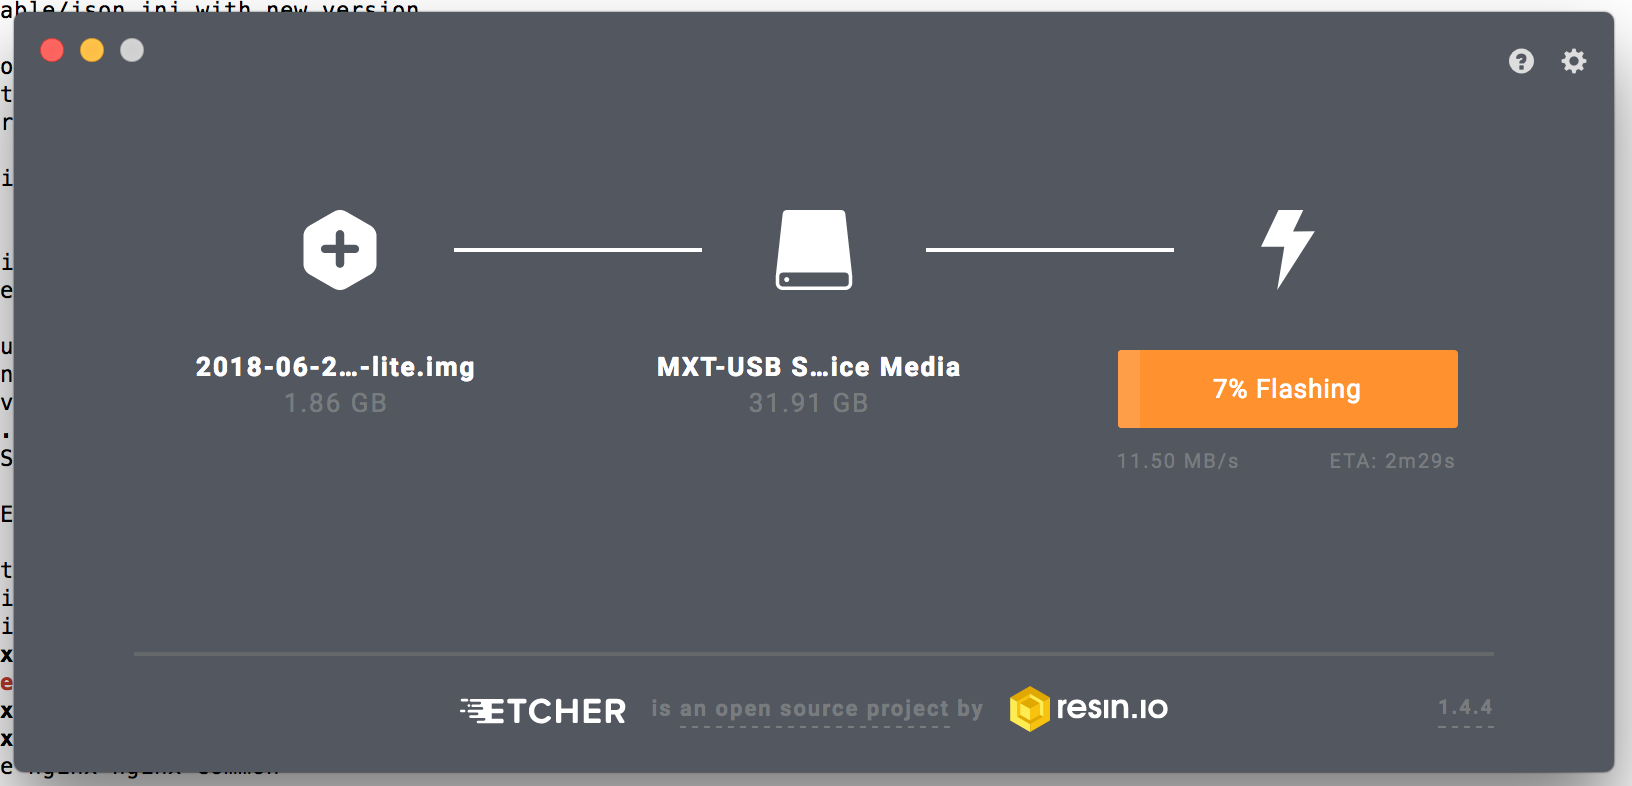
Drive flashing with Etcher – very straighforward
Once the image was burnt to the SD card, I almost forgot a crucial step – ensure that SSH support is available. These days Raspbian disables SSH support by default, so you’ll need to add it. It’s very, very simple. With the SD card mounted on whatever you’re using to burn and set up the Pi, save a file called ‘ssh’ (no quotes) to the SD card. You don’t need a file format, just a file called ssh. Now eject the SD card, insert it into the Pi and we’re ready to boot.
Connect an ethernet cable to the Pi, and connect the other end to your switch or router. Plug in the Pi power supplier, and turn it on – the Pi boots very quickly. Once it’s booted, you connect to the Pi via SSH on the command line, so open up your terminal (I’ve run all of this on a MacBook, but as long as you have a tool to SSH with, there’s no preference). I checked my home network and could see that my router had issued the Pi with an IP of 192.168.1.217. Your IP will more than likely be different. Via command line, run this to SSH into the Pi:
ssh pi@192.168.1.217
You’ll then receive a prompt stating that this is the first time this host has been accessed, and it’s authenticity cannot be confirmed. You’ll need to add this as a known host, so type ‘yes’ and then you’ll be prompted to provide the password to complete the SSH login. By default this is currently ‘raspberry’ (no quotes). Once you’ve supplied this, you’re at a command prompt. First task: secure the Pi by changing the default password to something secure. Type:
passwd
and follow the on-screen prompts. With the default SSH password changed (you did change it to something very secure, right?) we now need to update the Pi to run in any updates or upgrades. Issue the command:
sudo apt-get update
and then when this is complete, issue:
sudo apt-get dist-upgrade -y
Your Raspberry Pi is now up to date, there’s just a few more tasks to complete before you can dive into gathering network intelligence.
Install Tmux
Tmux is a great little tool – it’s a Terminal multiplexor, that allows to run multiple terminal sessions inside a single terminal window. Why might you need this? Well, if you’re running your network scan as quiet as possible (so that you don’t generate lots of abnormal network traffic that will raise flags and start alarms), and it’s a large network with lots of devices, you’re likely find that your SSH session might terminate, especially if you need to close down/sleep the machine you’re SSH’ing from. Tmux allows you to come back to that session, and jump straight back in. Run the following command to install Tmux:
sudo apt-get install tmux
and that’s it. To create a new tmux session, simply run:
tmux
and you’ll see a screen like this, from you then run all your commands.

Identify the Tmux session by the presence of the green bar at the foot of the terminal window
Tmux is pretty simple to use, I found that this Tmux Primer by Daniel Miessler is very in-depth, and is worth spending some time reading and practicing.
Change the name of the Raspberry Pi to something less obvious
When you drop your Warberry Pi onto your target network, you’ll want to be as covert as possible. So as to blend in with other network traffic, consider renaming your Pi from the default “raspberrypi” to something that if noticed, should stand out less; unless your target is legitimately running Raspberry Pi’s on the network, if a network admin notices a new device, it’s better that it’s called something that stands more chance of being accepted. Consider renaming it so that it looks like a Windows PC, a MacBook, a printer, an Android phone etc. Via command line run:
sudo nano /etc/hostname
and change the default ‘raspberrypi’ to whatever value you want. CTRL +X and hit Y to save the file. Now run:
sudo nano /etc/hosts
and look for the line:
127.0.1.1 raspberrypi
and change the ‘raspberrypi’ text to the same value that you’ve set for /etc/hostname. Issue a reboot command:
sudo reboot now
When your Pi reboots, it’ll now be seen on the network as whatever value you called it. This is how it appears on my home network after I renamed it to look like a MacBook:

Identifying the renamed Warberry Pi on my network
Notice that the command prompt now uses the new hostname, and not ‘raspberrypi’. Assuming you know something about your target, you’ll be able to think up a suitable name for camouflaging your device on the network, such as a printer, shared storage, Windows machine, Phone etc
Install Git
You may find that your Raspberry Pi doesn’t have Git installed on it, which you’ll need for the next step. It’s quick to do, by running:
sudo apt-get install git
Installing Warberry Pi and turning the Pi into an attack device
The final step, installing and running the script to turn our innocent Raspberry Pi into a covert network intelligence gathering device. Ensure that you’re in the /home/pi directory of your Pi, and run the following command to download the code for the Warberry Pi:
sudo git clone https://github.com/secgroundzero/warberry.git
Once the entire repository is downloaded, run an ls command to see that you’ve a new directory called ‘warberry’. Change into this directory, and examine the contents. You’ll notice a shell script called ‘setup.sh’, which needs to be made executable before we can run it, using the command:
sudo chmod +x setup.sh
When you examine the contents of the warberry directory, you’ll notice this file has changed colour (probably to green). Let’s run this script to install everything we need:
sudo ./setup.sh
and then wait for everything to download and configure. You’ll need to intervene a couple of times to set some options, for initial set up, leave the defaults as-is.
Run Warberry Pi
With everything downloaded and configured, it’s finally time to start using the Warberry. Navigate to the directory /home/pi/warberry and first identify you network adaptors with:
ifconfig
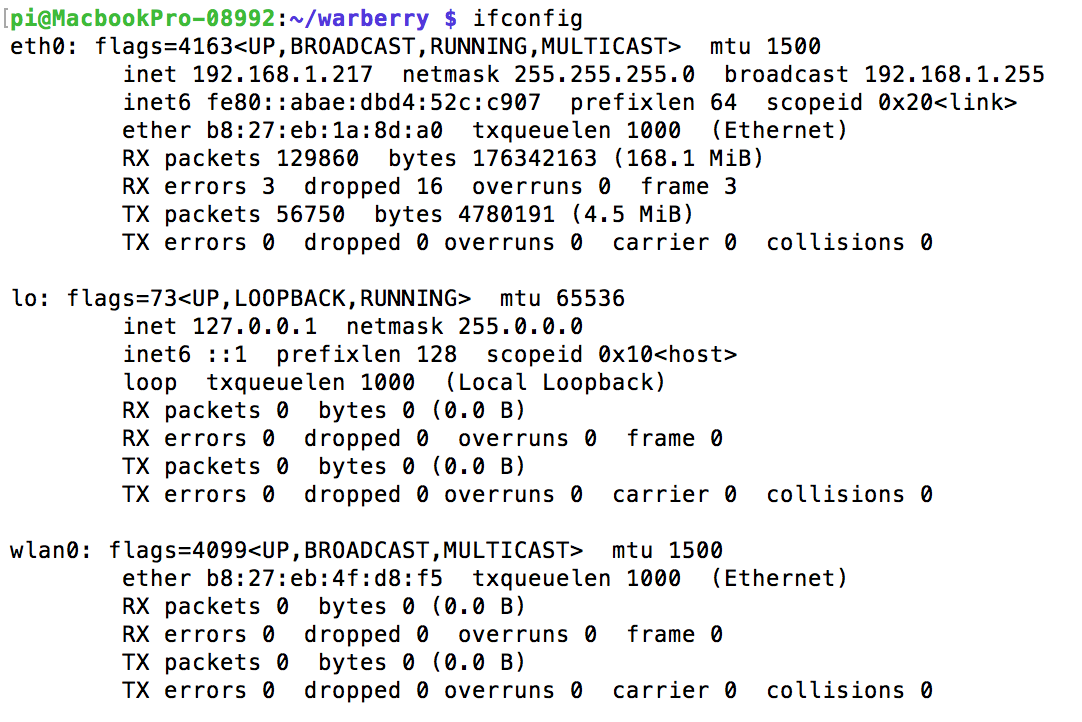
As I’m only running a network connection via ethernet, I can see that the network interface I need to use is called eth0. We need to tell the Warberry Pi script which interface to run on, which is specified with the flag -I. I’ll leave the default settings as-is for this initial scan, but here are a lot of options that you can set. For this post I’ve not plugged in my USB Wifi adaptor or USB Bluetooth adaptor into the Warberry, so I’ll not be setting any options that will scan either of those. There’s a detailed guide over at Peerlyst, but make sure you read it carefully as there’s a couple of commands that have been updated and are no longer relevant.
Time to run the scan and let the script work away. First create a new Tmux session (if required) with :
tmux
and then issue the command to run the Warberry Pi script using eth0 interface:
sudo python warberry.py -I eth0
The script kicks off, and it’s just a case of watching and waiting. The output is quite verbose, so you can see what’s being scanned.
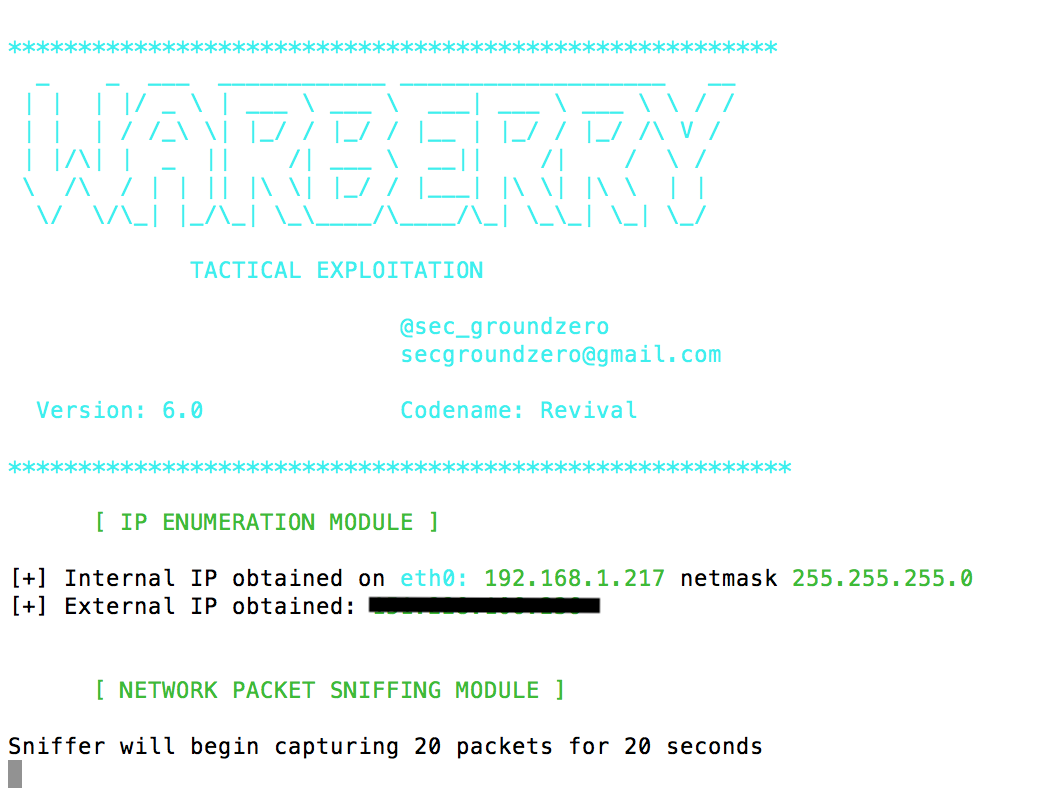
Starting the Warberry scan
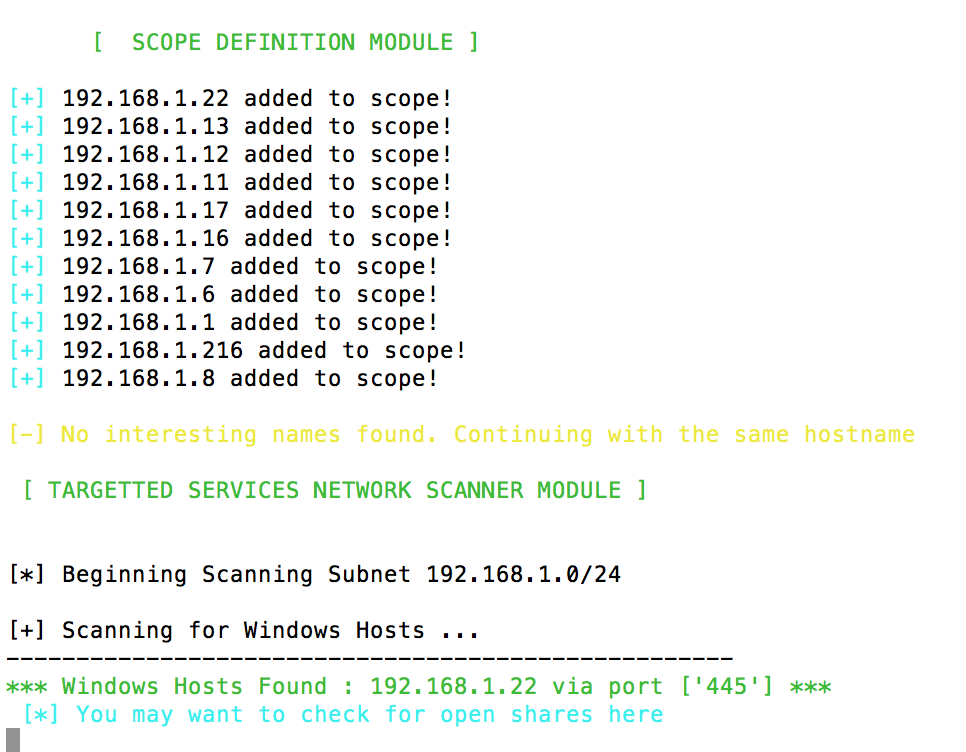
Devices found on the network and added to scope
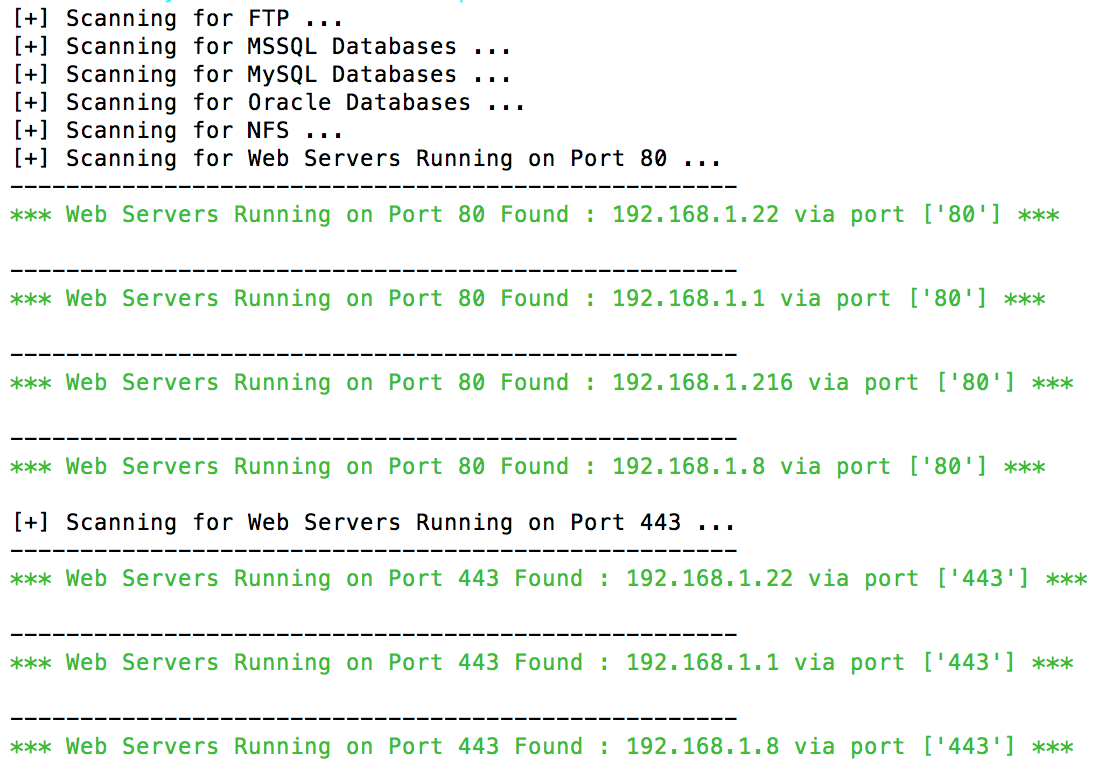
Scanning for databases and web servers
Once the scan is complete, you’ll be returned to the command prompt. How long this takes depends on the size of the network that’s scanned, the services that are running on each device, and also the intensity of the scan that you ran. T1 is the slowest and stealthiest intensity, T4 is the aggressive scan that stands more chance of standing out on a monitored network. For familiarising yourself with the Warberry on your own network training scenarios, go for T4 whilst you get up to speed. When you’re deploying into the field, you’ll want to be somewhat more covert and not advertise your presence.
Results and reports
There’s a couple of steps that you’ll need to complete before you can review the results, but it won’t take long to set up. You could set up Apache and PHP on the Warberry, and then access the reports by connecting to the Warberry webserver. However, as you’re trying to stay covert, you probably won’t want to start adding webservers to the network you’ve managed to infiltrate. You could set up reverse SSH and exfiltrate the report data, however for the purposes of this post, let’s assume that you’ve managed to retrieve the Warberry.
Connect the Warberry to your network, and grab the IP address that it’s given. I’m working with the following IP addresses:
My current laptop: 192.168.1.18

Warberry Pi: 192.168.1.217
Via command line, we’re going to copy the necessary data from the Warberry. We need to copy over data from the following locations:
/home/pi/warberry/Reporting /home/pi/warberry/Results /home/pi/warberry/warberry.db
I’ll be copying the data over to my laptop and dropping it into a folder called ‘pi’:
scp -r pi@192.168.1.217:/home/pi/warberry/Reporting /Users/Paul/pi


scp -r pi@192.168.1.217:/home/pi/warberry/Results /Users/Paul/pi


scp pi@192.168.1.217:/home/pi/warberry/warberry.db /Users/Paul/pi
I’ll be using a local instance of Apache running PHP and SQLite3 to serve the results. Copy the files that you grabbed from the Warberry, and drop them into
/var/www/html/
Move warberry.db into the Reporting folder. We now need to edit a config file so that the report knows where to find warberry.db, so open and edit the following file:
nano /var/www/html/Reporting/WarBerryReporting/SQLiteConnection/php/Config.php
Find the line that contains:
const PATH_TO_SQLITE_FILE = '/Library/WebServer/Documents/Reporting/WarberryReporting/SQLiteConnection/db/warberry.db';
and change it to:
const PATH_TO_SQLITE_FILE = '/var/www/html/Reporting/warberry.db';
Press CTRL + x to exit hit Y to save the changes. You might need to restart Apache to pick up the changes, so issue:
/etc/init.d/apache2 restart
Now point your browser to
http://localhost/Reporting/WarBerryReporting/Theme/indexReporting.html
A point to note; when you first run the report, make sure that your browser tools are running and you’re monitoring the network requests and console, as there were a number of typos that I needed to fix in some files before it would run correctly.
The reporting framework is nicely put together; you’ll be able to access all the scans you’ve successfully executed. Information is split into the following panels:
- Session info
- Warberry session info
- Active IP’s found
- Bluetooth devices found
- WiFi networks found
- Services identified
- Hashes pulled from Windows machines.
Select some of the values, and they’ll return a pop-up light box that dives deeper into the scan results:
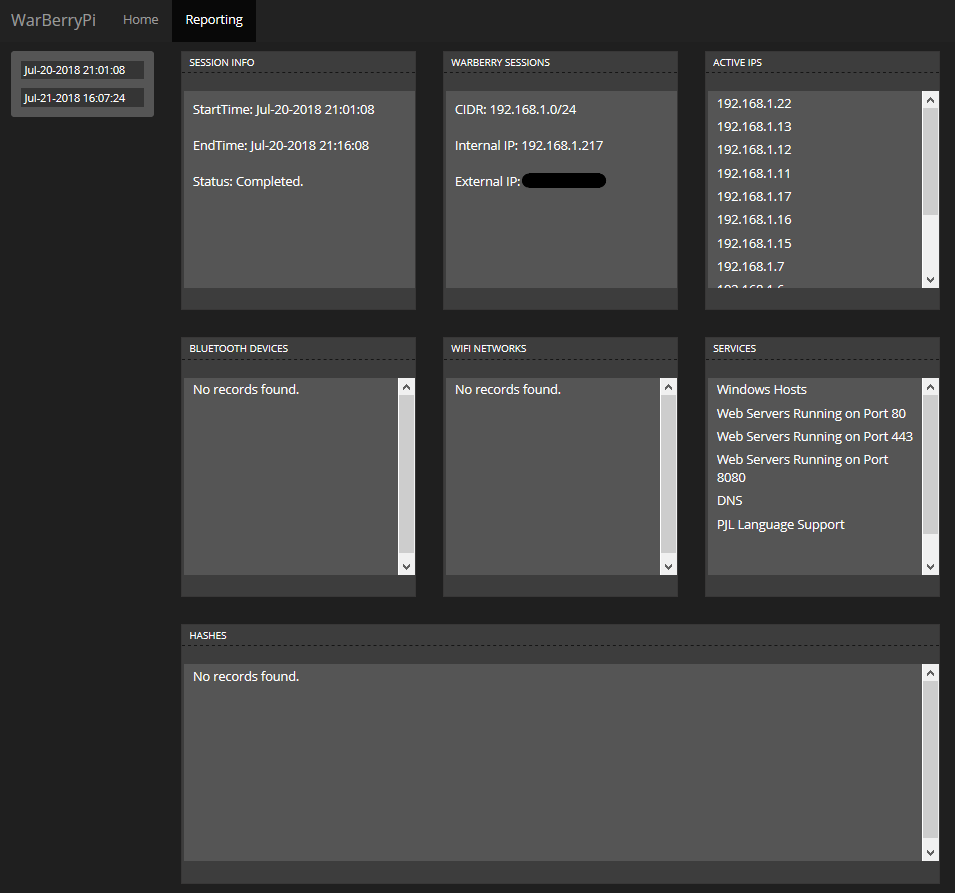
Warberry Pi reporting dashboard
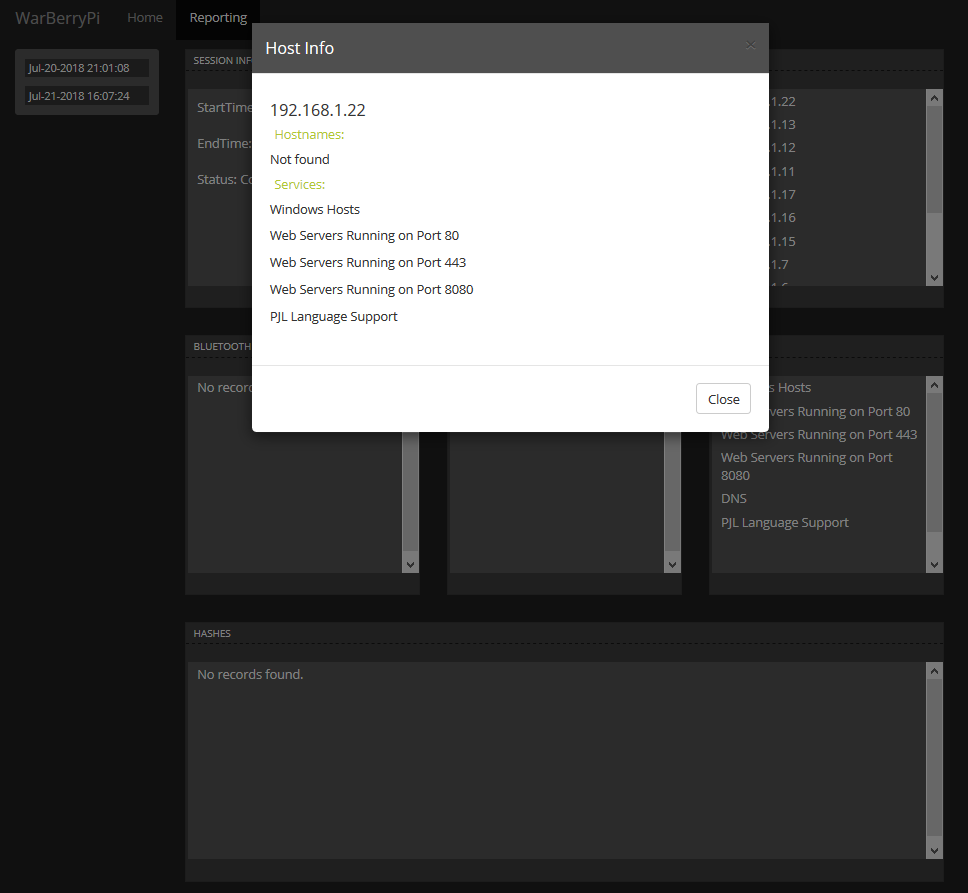
Detailed information of a host identified on the network

DNS reported to be running on this device
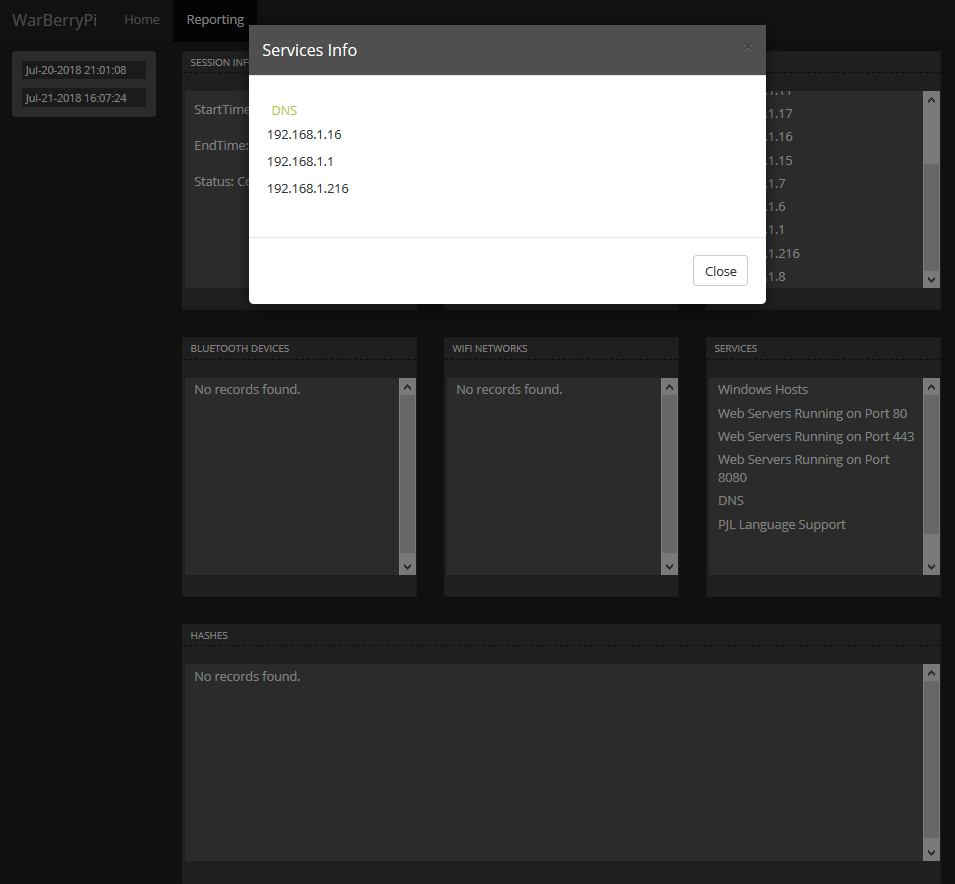
Select a service, all related hosts are returned
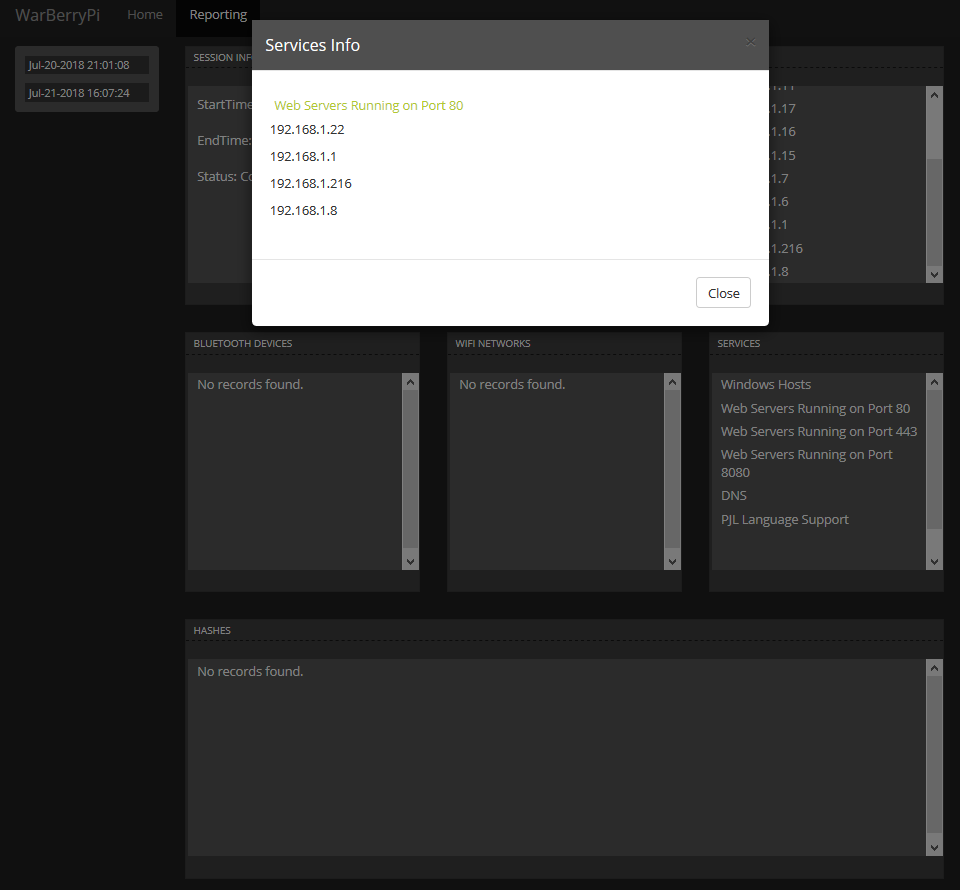
These hosts are running webservers
Viewing the database content directly
Of course, if you don’t have the time or inclination to set up a webserver with PHP, SQLite 3 and configure it, there’s a much simpler option – view the data directly from the warberry.db database file.
Copy the warberry.db file over to your local machine, and then install a copy of DB Browser for SQLite; it’s available on most platforms. Once it’s installed, fire it up and open the warberry.db file you’ve exfiltrated from the Warberry Pi; now it’s just a simple matter of browsing the schema:
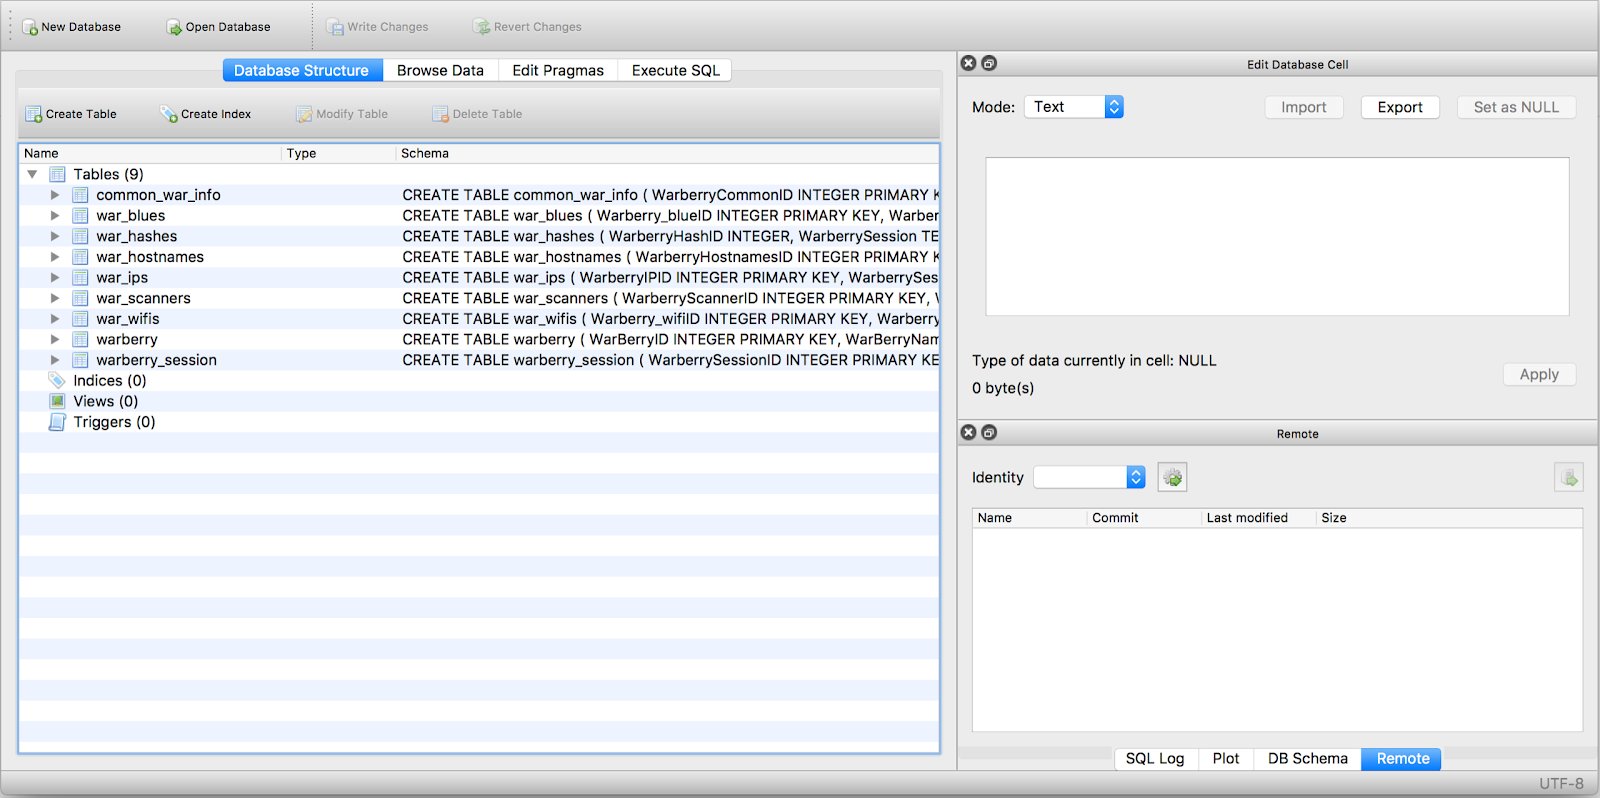
The DB schema
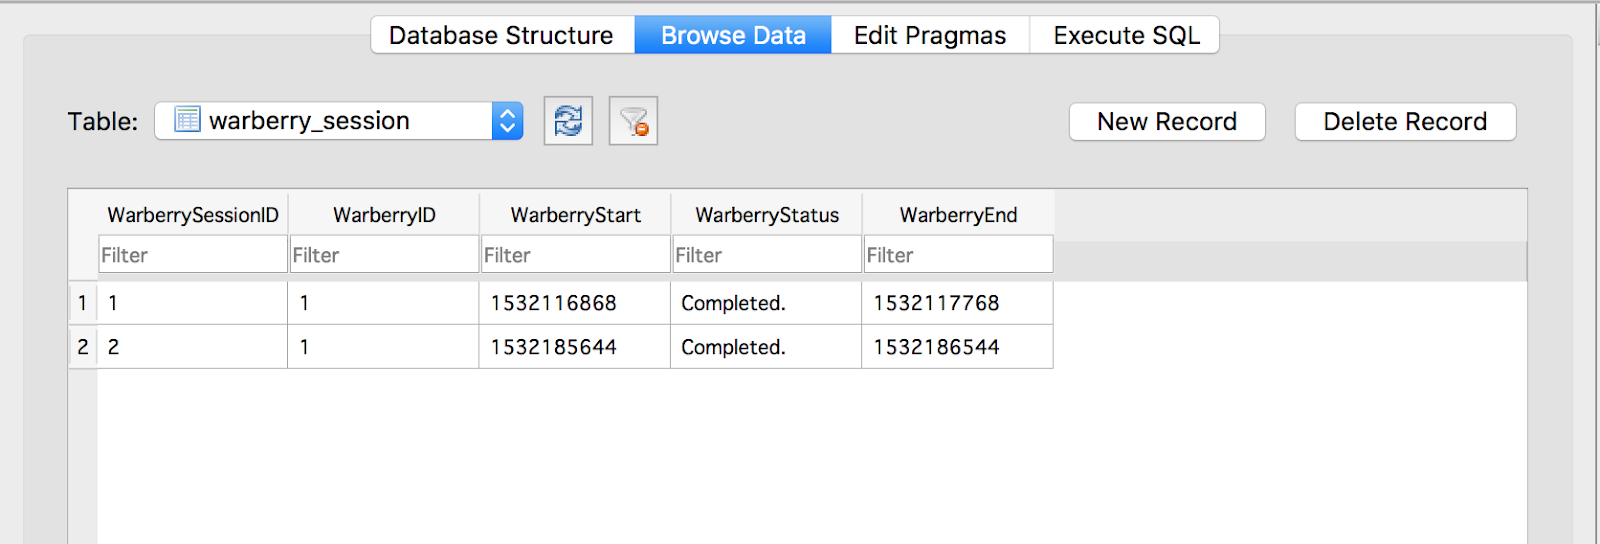
Session info

Identified IP’s
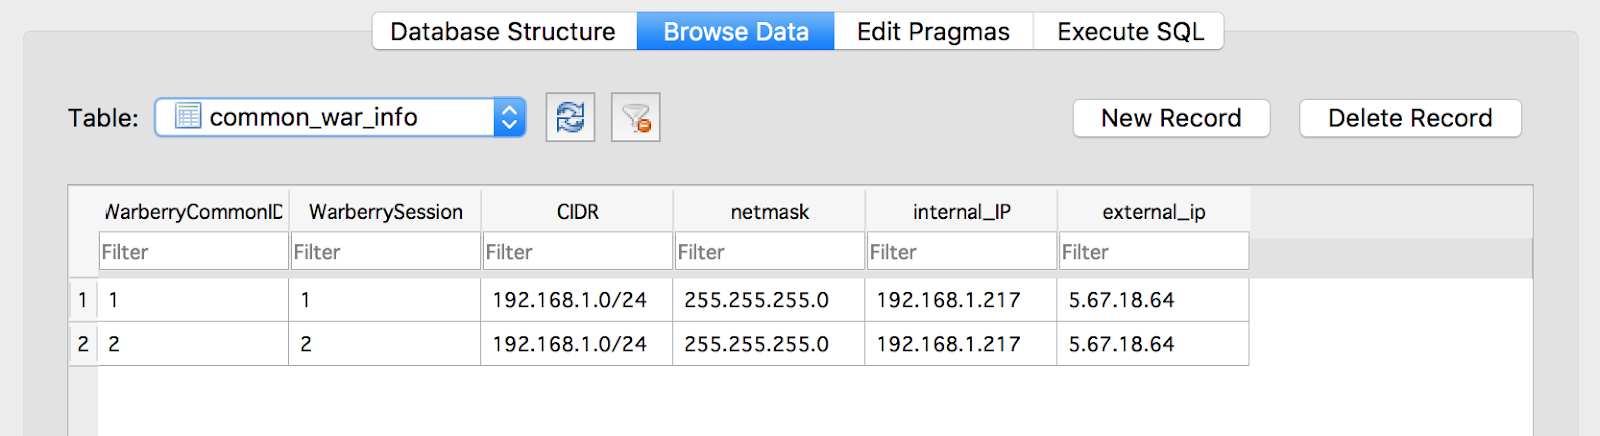
Session info

Identified services
Conclusion
The Warberry Pi is a superb piece of work, the team behind it (@Sec_GroundZero ) have really put a great deal of hard work and effort into it, and with a bit of tinkering, it’s going to an essential part of my field kit. The real test will come on an active engagement.
If you’ve got a spare Raspberry Pi laying around, it’s well worth an afternoon of your time. If you’ve been considering buying a Pi for a while but haven’t gotten around to it, this is the project to give you that push and order one. Pi’s are really versatile, and the ability to swap out the SD card and use the Pi for another project means it’s such a cost effective piece of hardware.
I’ve really enjoyed tinkering around with this project, I’ll need to perform some benchmarking to see how it performs, but overall I’m happy that I stumbled across this project, and urge you do give it a go.
Next steps
With the Warberry Pi up and running, there’s a few more things I’m planning on doing to make it a more usable and effective, including:
- Configure reverse SSH tunnel to a VPS
- Configure a cron job to start the warberry scan on boot
- Scp/rsync to exfiltrate results to remote server on completion.
- Add a WiFi adapter and BlueTooth adapter to increase coverage of the environment
- Test performance and timings on a large network. (scans, web server, WiFi, Bluetooth etc)
- Disguising the Warberry Pi – make that little black box blend into the surroundings. Something like this one, hidden inside a power supply sounds like a great project.
- Test performance using a USB battery